Layers
The commonest comparison for Layers is to a stack of transparencies. The background (in this case, the initial image we chose to edit) cannot have an alpha channel (be transparent), but you can add layers on top of it that are. In the case of the text layer you just created, it's transparent everywhere there isn't black text. You should also notice that the text layer is much smaller than the image: layers don't have to be the same size. If we added another opaque layer on top of our image, then you'd only see the opaque layer on top. Layers can also be partially transparent - we'll get to that.
To see what layers we have, let's open the "Layers, Channels & Paths" dialogue box - depending on how the GIMP is set up, it may be open already on your machine. Even if it is already open, it won't do any harm to use the menu item to activate it. Right-click on the image and select "Layers -> Layers, Channels & Paths ..." You should see something similar to the following:
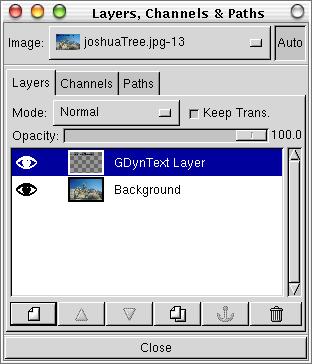
The Layers, Channels & Paths Dialogue box.
Note that we have two layers, one titled "Background" (which is the original image) and one titled "GDynText Layer" which was added by the text tool. There are a lot of things you can do with layers. The most basic is controlling the visibility of the layer: click on the eye icon beside the layer to toggle its visibility on and off. You'll find that if you turn off the Background, you'll see a checked pattern of light and dark gray squares. This indicates that there's nothing visible in any area where you see that pattern. Leave both layers visible when you're done.
If you click just to the right of the eye icon, you'll see the link icon, a set of crossed arrows (like the move tool we'll be discussing shortly). Clicking on them toggles them on and off. Leave these turned off for now.
Notice that if you click on a layer (towards the right side, away from the eye and link icons) the layer becomes highlighted. When the layer is highlighted, any tools you use will be applied to that layer - even if the layer isn't currently visible because it's behind another layer or the visibility is toggled off. I've been caught off guard by that, it's something to watch out for. Always be aware of which layer is selected so you know what you're working on.
You can create new layers (the single piece of paper icon in the "Layers, Channels & Paths" dialogue), or duplicate existing layers (the double pieces of paper in the dialogue). New layers are usually used to overlay another visual piece on an existing image, while duplicate layers allow you to change existing data while simultaneously keeping it in unmodified form.
Try right-clicking on a layer and notice that there's a menu associated with the layer. This is material you'll have to explore on your own.